Oleksii Nimchuk
Are you fond of the starry sky but don’t have a professional camera yet? It doesn’t matter! Even with a regular smartphone, you can take amazing astronomical photos.
In this article, photographer Oleksii Nimchuk reveals the secrets of successful astrophotography that are available to every astronomer. Learn how to properly set up your smartphone camera, choose the best shooting parameters, and even take pictures of the Moon, Sun, and planets.
A bit of theory. The “trinity” of exposure
To take a beautiful and high-quality astrophoto with your smartphone, you first need to understand a few photography basics. Any camera (smartphone or camera) operates with three main parameters that are the basis of exposure: shutter speed, aperture, and ISO (light sensitivity). Let’s take a quick look at each of them.
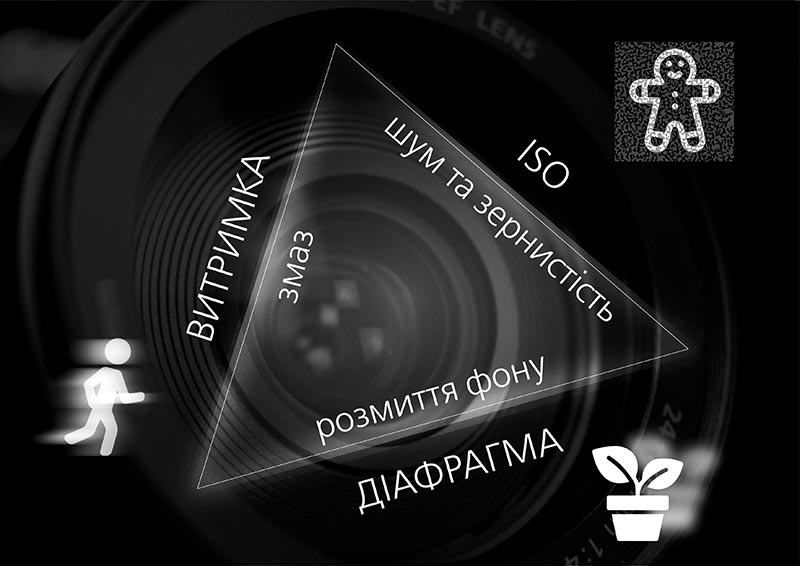
Exposure is the time during which the shutter of a digital camera is open and light can enter the sensor (light-sensitive element). The range of exposures is wide, and photographers can choose shutter speeds of fractions of a second (1/30, 1/500, 1/2000) for daytime photography and use long shutter speeds (several seconds) at night. The slower the shutter speed, the more light will reach the photosensitive element and the brighter the photo will be.
A lens aperture is a relative opening characterized by an adjustable diameter through which an optical image is projected onto the digital camera sensor. The smaller the aperture of the lens, the larger the relative opening and the more light reaches the light-sensitive element of the sensor.
Light sensitivity (ISO) is a unit of measurement for the sensitivity of a sensor to light. The higher the ISO number, the more sensitive the sensor is. For example, a sensor at ISO 1600 is more sensitive to light than one at ISO 100, which allows you to take a picture in low light conditions.
It is clear that when taking starry sky astrophotography, all these parameters should be “maximized,” meaning that the shutter speed should be fast, the aperture should be fully open, and the ISO should be maximized. But each of these “maximum” settings brings its own disadvantages to astrophotography. A fast shutter speed requires image stability, and the stars move quite quickly at high magnifications, which leads to “tracks” in the photo. The aperture in inexpensive lenses is not always fully open, as this can lead to defects at the edge of the image. And ISO at high values leads to “noise” and graininess in the photo. Therefore, the selection of these parameters must be careful.
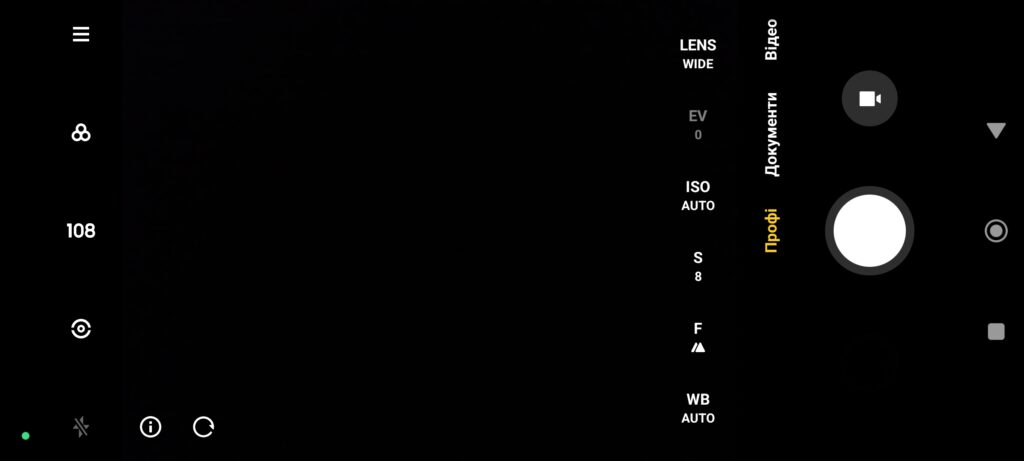
Normally, the correct selection of parameters in a smartphone is always automatic, and after further digital image processing, the smartphone produces the final result. In the case of astrophotography, the “automatic” settings often work incorrectly, so you should set everything up yourself. To do this, many smartphones have a built-in manual shooting mode that allows you to select the parameters yourself. If you don’t have such a mode, there are plenty of free apps on the AppStore and PlayMarket that can be used for this purpose (Open Camera, Footej Camera, Manual Camera).
How to take an astrophoto on a smartphone? A step-by-step guide
Astro landscape
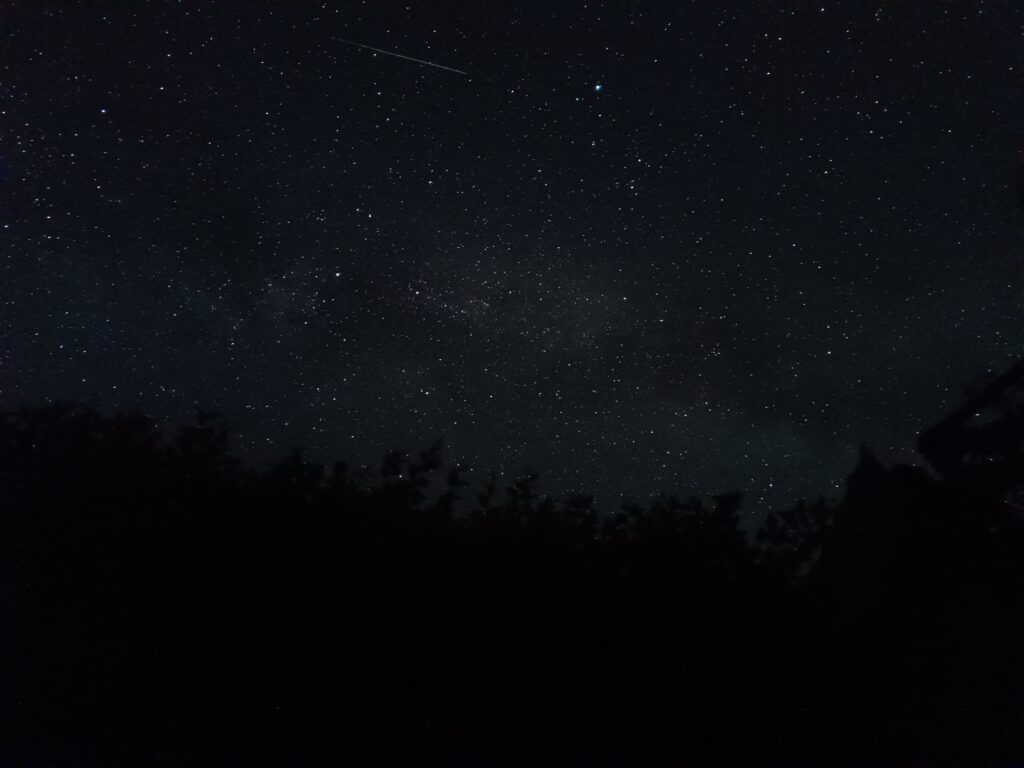
First, let’s take an astrophoto of the Milky Way landscape.
Step 1. Use a tripod. First of all, you need to fix your smartphone on a tripod or on any fixed platform that will eliminate any vibrations of the smartphone from hand tremors and allow you to take a long exposure.
Step 2. Search for the object. Finding the Milky Way is quite easy. In the unlit night sky, it will be in the southern part of the sky (a silver light streak in the middle of the sky). Its brightest parts will be just above the horizon.
Step 3. Focusing. Next, focus manually “by the stars”, because autofocus will often fail to do it correctly. The main thing when focusing is to achieve the minimum size of the stars in the frame.
Step 4. “Trinity”. Set the ISO to almost the maximum (but don’t overdo it, otherwise the photo will be too noisy), open the aperture as wide as possible, and set the shutter speed to 6-8 seconds (you shouldn’t set a longer shutter speed, as the stars will turn into tracks due to the rotation of the celestial sphere).
Step 5. “Shot”. At the end, press the self-timer for a few seconds to minimize any external influence and wait for the finished shot.
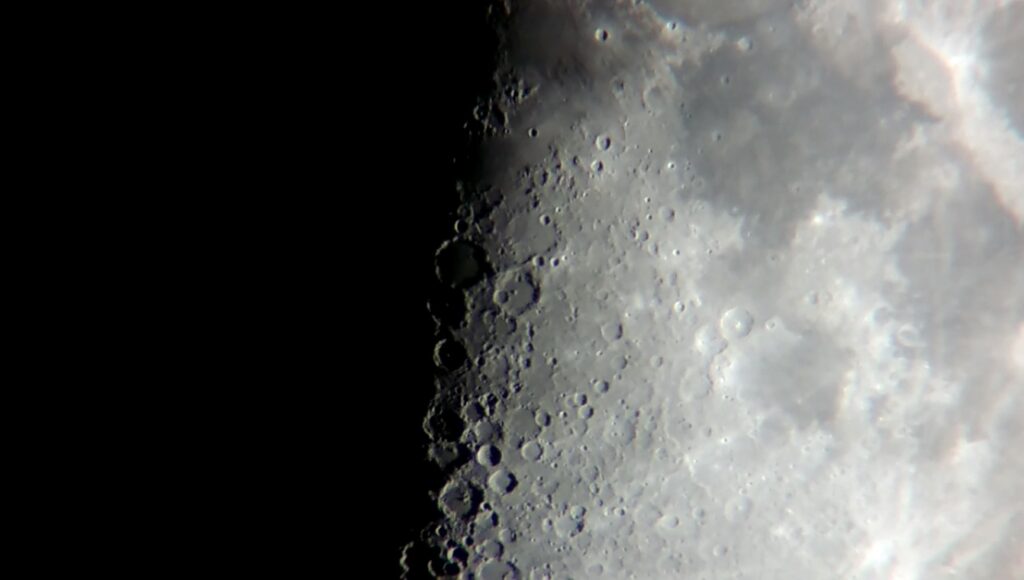
Astrophoto of the Moon, Sun, and planets
Another type of astrophoto that can be realized with your smartphone is taking pictures of objects such as the Moon, Sun, or planets through a telescope, binoculars, or a telescope. The easiest way is to use your smartphone to take pictures through the eyepiece of an optical instrument.
Step 1. Preparation. First, you need to prepare a mount to firmly fix your smartphone to the eyepiece using either a special bracket that can be purchased at astro-shops or a mount you make yourself. In either case, the mount should fix the smartphone and allow you to observe the object through the eyepiece on the smartphone screen.
Step 2. Search for the object. Point at the Moon or planets. The Moon is quite easy to find, and to find the planets, you can use the simplest applications Stellarium or StarWalk2.
Step 3. Focusing. First, we focus visually on the telescope itself, and only then install the smartphone and focus on it so that we can clearly see the small details of the observed object.
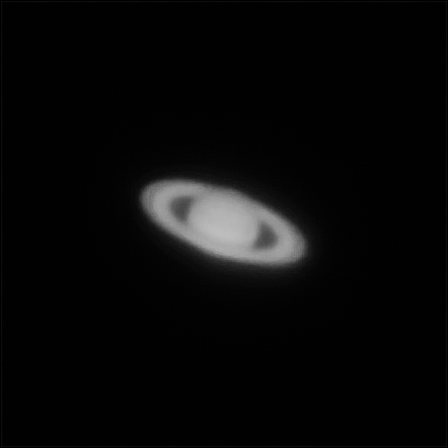
Step 4. “Trinity”. Next, set the appropriate parameters for the correct exposure. In the case of astrophotography of the Moon, Sun, and planets, shutter speed and ISO should be greatly reduced, and aperture should be narrowed (auto mode can handle this as well). WARNING. To take pictures of the Sun, you must use special solar filters.
Step 5. “Rapid Fire”. For a more professional astrophoto of the planets and the Moon, you can take a series of shots (or shoot a video), which can be superimposed on each other later in processing using special programs (PIPP, AutoStakkert, RegiStax6), which will eventually increase the detail of the object.
So, armed with these practical tips, you’re ready to embark on an exciting astrophotography journey! Let your smartphone become a window to the universe, and let each photo be a small masterpiece that reflects your passion for the starry sky. Remember, even the simplest tools can work wonders in the hands of an artist. So don’t limit your imagination, experiment and discover new facets of the beauty of space. Who knows, maybe your photo will become an inspiration for future astronomers!
